Getting Started
Pixelpart is an application designed for creating stunning visual effects in 2D and 3D. The application utilizes particles as the basic visual elements, and you have complete control over particle movement and appearance. You can even simulate natural forces like gravity, wind, and collisions to create realistic effects. It offers a variety of plugins that enable direct use in game engines. Furthermore, effects can be exported to sprite sheets, videos, image sequences and animated images.
User interface
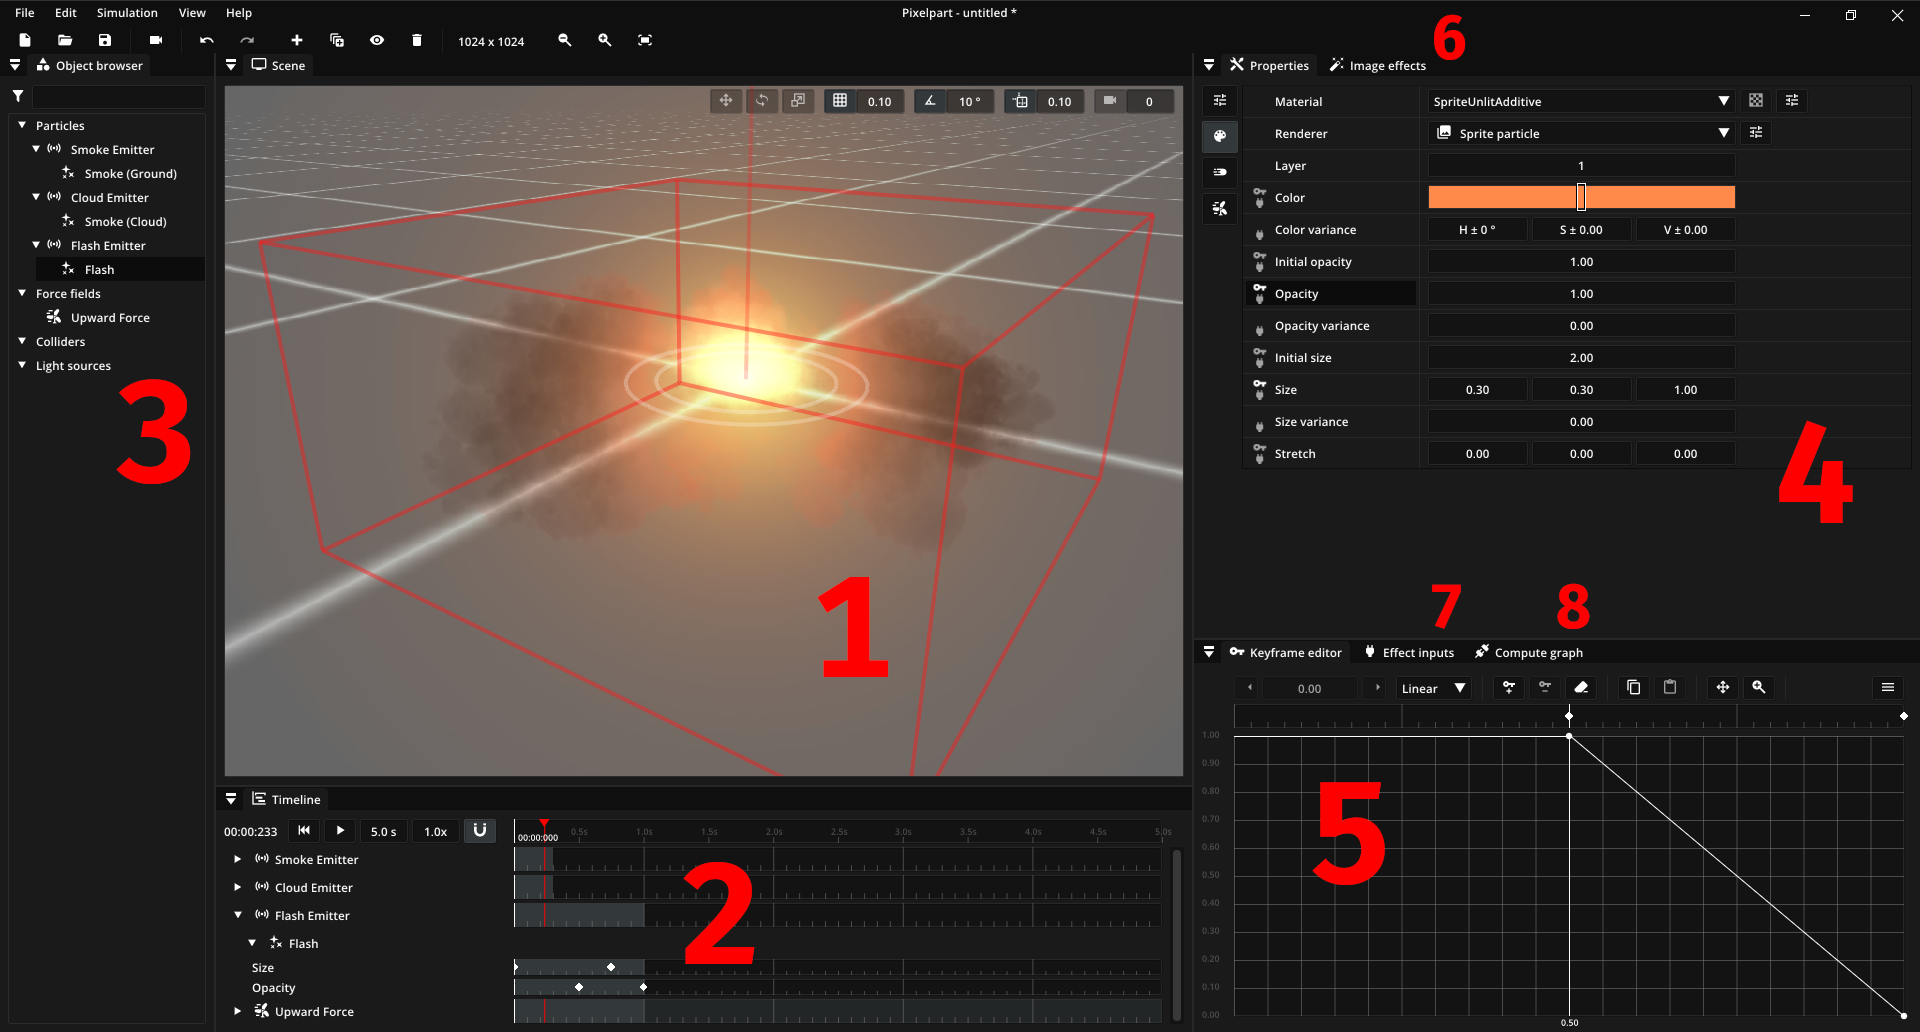
The user interface of Pixelpart is composed of several main windows:
Scene: The scene view shows the effect in action and a timeline at the bottom. The scene view is interactive, so you may move and manipulate objects while the effect is playing.
Timeline: The timeline window shows the current progress of the effect and the timing of objects in the scene. You can pause and restart the effect in this window.
Object browser: The object browser shows a list of all objects (particle types, particle emitters, force fields and colliders) in the scene.
Properties: The properties window lists the properties of the selected scene object.
Keyframe editor: You can animate the selected property in this window.
Image effects: The image effects window makes it possible to apply and configure post-processing effects.
Effect inputs: You can add inputs to your effect in this window, which is used to supply external data to the effect, primarily when using game engine plugins.
Triggers: You can define triggers in this window, which can be used to let external events influence the effect, primarily when using game engine plugins.
Compute graph: In the compute graph window you can change how the selected property is computed from the defined effects inputs.
Note
You can move and dock windows anywhere you like by dragging the title bar.
Managing effects
Creating new effects
After starting Pixelpart for the first time, you will see the default 2D effect being played. To start from a more complex preset, create a new project by clicking New effect… in the toolbar or the menu bar.
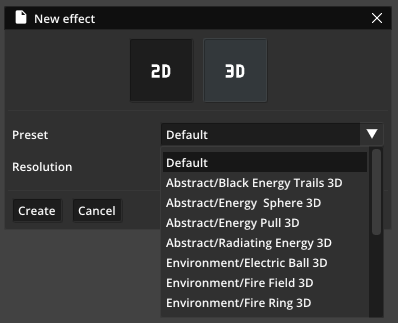
First, decide if you want to create a 2D or a 3D effect. Then you can select a preset, which will become the base for your effect, which you can modify as you like. If you do not want to start from a preset but from the default effect with just a basic particle emitter, leave the preset setting as it is. Finally, click Create to start working with the new effect. Your first effect is now playing inside the Scene window!
Note
Shortcut: Start creating a new effect with Ctrl+N.
Saving effects
When you have finished working on an effect and want to save your work for next time, save the effect as a .ppfx file. You can do so in the File menu or the toolbar by clicking Save. When you save an effect for the first time, Pixelpart will ask you to select a location for the file.
Note
Shortcut: Save the active effect with Ctrl+S. To select a new file location, press Ctrl+Shift+S on your keyboard.
Loading effects
To load an existing effect, click Open effect… in the File menu or the toolbar, which opens a file browser to select the file you want to load. Pixelpart also remembers the files you have recently worked with. To open a recently loaded effect hover over Open recent in the File menu and select the effect file.
Note
Shortcut: Load an effect with Ctrl+O.
Designing effects
Creating effects in Pixelpart involves designing different particle types, creating emitters for those particles and placing other objects that influence particle behavior. There are two types of objects:
Particle types, which define the appearance and behavior of particles. This includes visual properties like the color and size of particles, but also behavioral properties like movement paths, acceleration and rotation.
Nodes, which are placed somewhere in the scene and - depending on the type of node - generate or modify particles in some way.
You have access to five different types of nodes:
Particle emitters, which spawn new particles. Particle emitters continuously instantiate new particles of their assigned particle types in a defined area, like inside a circle or on a line. They also define in which direction particles move initially.
Force fields, which influence particles by applying forces to them and can be used to model things like gravity and wind.
Colliders, which are objects particles collide with and are used to simulate particles hitting and bouncing off solid surfaces.
Light sources, which can be used in 3D effects to apply lighting to particles.
Group nodes, which you can use to move several other nodes in sync. They don’t have any effect on particles.
Many properties of these objects can be animated with keyframe animation in order to make particles and object change over time. Similarly, you can animate the position of objects with motion paths.
It is also possible to enhance the effect you have created with additional image effects, which are filters that are applied to the whole effect after rendering, such as motion blur and color correction.
When using game engine plugins it is often necessary to let visual effects react dynamically to the game state. Pixelpart offers effect inputs and triggers for this purpose.
Using effects outside of Pixelpart
Once you have created an effect, you can use it outside of Pixelpart in two ways.
You can render the effect to a sprite sheet, image sequence, animated image, or video. These formats are compatible with a variety of game engines and video production software.
You can save the effect and directly import it into game engines using the provided plugins.