3D Rain Effect (Intermediate)
This guide walks you through creating a 3D rain effect in Pixelpart from scratch without using any presets. Along the way, you’ll learn how to use the transformation gizmos and effect inputs to make your effect react dynamically to gameplay.
Note
Intermediate level: You should already be familiar with creating simple effects in Pixelpart before following this guide.
To begin, create a new 3D effect without selecting a preset.
Rain emitter
We’ll start by modifying the default particle emitter to create the rain.
Rain particles need to fall downward, so first select the emitter and move it upward using the translation gizmo. You can activate the translation gizmo by pressing W while hovering over the scene view.
You can also select the active gizmo in the toolbar at the top of the scene view:

: Gizmo for moving nodes
: Gizmo for rotating nodes
: Gizmo for resizing nodes
Next, change the emitter shape to Rectangle. Rain should spawn across a wide area instead of from a single point.
At first, the emission area will be vertical instead of horizontal. Select the rotation gizmo by pressing E while hovering over the scene, or by selecting in the toolbar. Then hold the red rotation circle and rotate the emitter by 90° so the rectangle lies horizontally.
The emission area is still fairly small, so switch to the scaling gizmo by pressing R while hovering over the scene, or by selecting in the toolbar. Drag the red and green handles outward to enlarge the emission area.
The emitter now has the correct position and size, but the rain particles are still falling sideways. To fix this, set the Z value (the last value) of the emitter’s Direction property to -90°.
We also want the rain to fall straight down without random variation, so set the Spread property to 0°. Your effect should now look similar to this:

Rain particle type
Now that the particles are emitted correctly, we’ll make them look like rain.
We’ll use the default particle sprite and stretch it into a raindrop shape. Open the Visual tab and and set the X value (the first value) of the Size property to 0.1. Let’s also add some randomness in size by setting Size variance to 0.05.
The particles also fall too slowly by default. Open the Motion tab and set the Initial velocity to 3. Then set Velocity variance to 1 to introduce some randomness in the falling speed.
You can also change the color in the Visual tab to your liking.
By now, the effect should look something like this:
Intensity effect input
At this point, the effect is already usable in a game. However, you may want the rain intensity to change dynamically depending on gameplay conditions. For example, rain could gradually increase during a weather transition from sunny to stormy.
You could control every particle property manually through code, but this quickly becomes difficult to maintain as more properties are involved.
Pixelpart solves this with effect inputs: Effect inputs are high-level parameters such as Intensity that you define inside Pixelpart. You can then decide how they influence particle properties. In your game code, you only need to update a single input value, for example:
set_input_float("Intensity", 2.0)
To create the input, open the Inputs window (usually located in the bottom-right corner), click Add attribute and select Number.
Let’s also rename the effect input to Intensity. Double-click the name, enter the new name, and press Return to confirm.
Defining the input alone does not affect the effect yet. We still need to connect it to particle properties using Compute graphs. Select the rain particle type again, then select the Number property in the General tab. This property controls how many particles are emitted. Now open the Compute graph window, which is usually next to the Keyframe editor. You will see a graph workspace used to define how the selected property is computed from the effect inputs. The inputs can be combined and transformed in complex ways, but for our case, we just want to multiply the defined particle count by Intensity input. To do this, connect the Intensity input to the output node by dragging a link between them. Then change the output mode from Set to Multiply.
At this point, the emitter may suddenly stop producing particles entirely! This happens because the Intensity input still has its default value of 0. Let’s increase the value by dragging the slider to the right. As the value increases, more rain particles will be emitted.
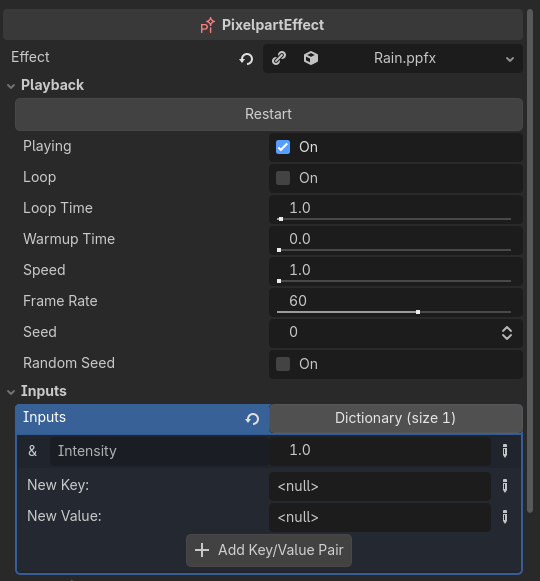
In Godot or other supported game engines, attaching the rain effect to a PixelpartEffect node automatically exposes the Intensity input under Inputs in the editor.
You can also modify the intensity dynamically at runtime through code. The following Godot script gradually increases the rain intensity over time until it reaches a value of 5.
func _process(dt):
   var intensity = $RainEffect.get_input_float("Intensity");

   if intensity < 5.0:
      $RainEffect.set_input_float("Intensity", intensity + dt);
In this guide, we’ve only scratched the surface of effect inputs. For example, you could also change the size of rain depending on the intensity value, or add another input that controls the strength of a force field to add some wind to the rain effect.